API Reference
adafruit_clue
A high level library representing all the features of the Adafruit CLUE.
Author(s): Kattni Rembor
Implementation Notes
Hardware:
Software and Dependencies:
Adafruit CircuitPython firmware for the supported boards: https://github.com/adafruit/circuitpython/releases
Adafruit’s Bus Device library: https://github.com/adafruit/Adafruit_CircuitPython_BusDevice
Adafruit’s Register library: https://github.com/adafruit/Adafruit_CircuitPython_Register
Adafruit’s LSM6DS CircuitPython Library: https://github.com/adafruit/Adafruit_CircuitPython_LSM6DS
Adafruit’s LIS3MDL CircuitPython Library: https://github.com/adafruit/Adafruit_CircuitPython_LIS3MDL
Adafruit’s APDS9960 CircuitPython Library: https://github.com/adafruit/Adafruit_CircuitPython_APDS9960
Adafruit’s BMP280 CircuitPython Library: https://github.com/adafruit/Adafruit_CircuitPython_BMP280
Adafruit’s SHT31D CircuitPython Library: https://github.com/adafruit/Adafruit_CircuitPython_SHT31D
Adafruit’s NeoPixel CircuitPython Library: https://github.com/adafruit/Adafruit_CircuitPython_NeoPixel
- class adafruit_clue.Clue
Represents a single CLUE.
- property acceleration: Tuple[int, int, int]
Obtain acceleration data from the x, y and z axes.
This example prints the values. Try moving the board to see how the printed values change.
To use with the CLUE:
from adafruit_clue import clue

while True:
    print("Accel: {:.2f} {:.2f} {:.2f}".format(*clue.acceleration))
- property altitude: float
The altitude in meters based on the sea level pressure at your location. You must set
sea_level_pressureto receive an accurate reading.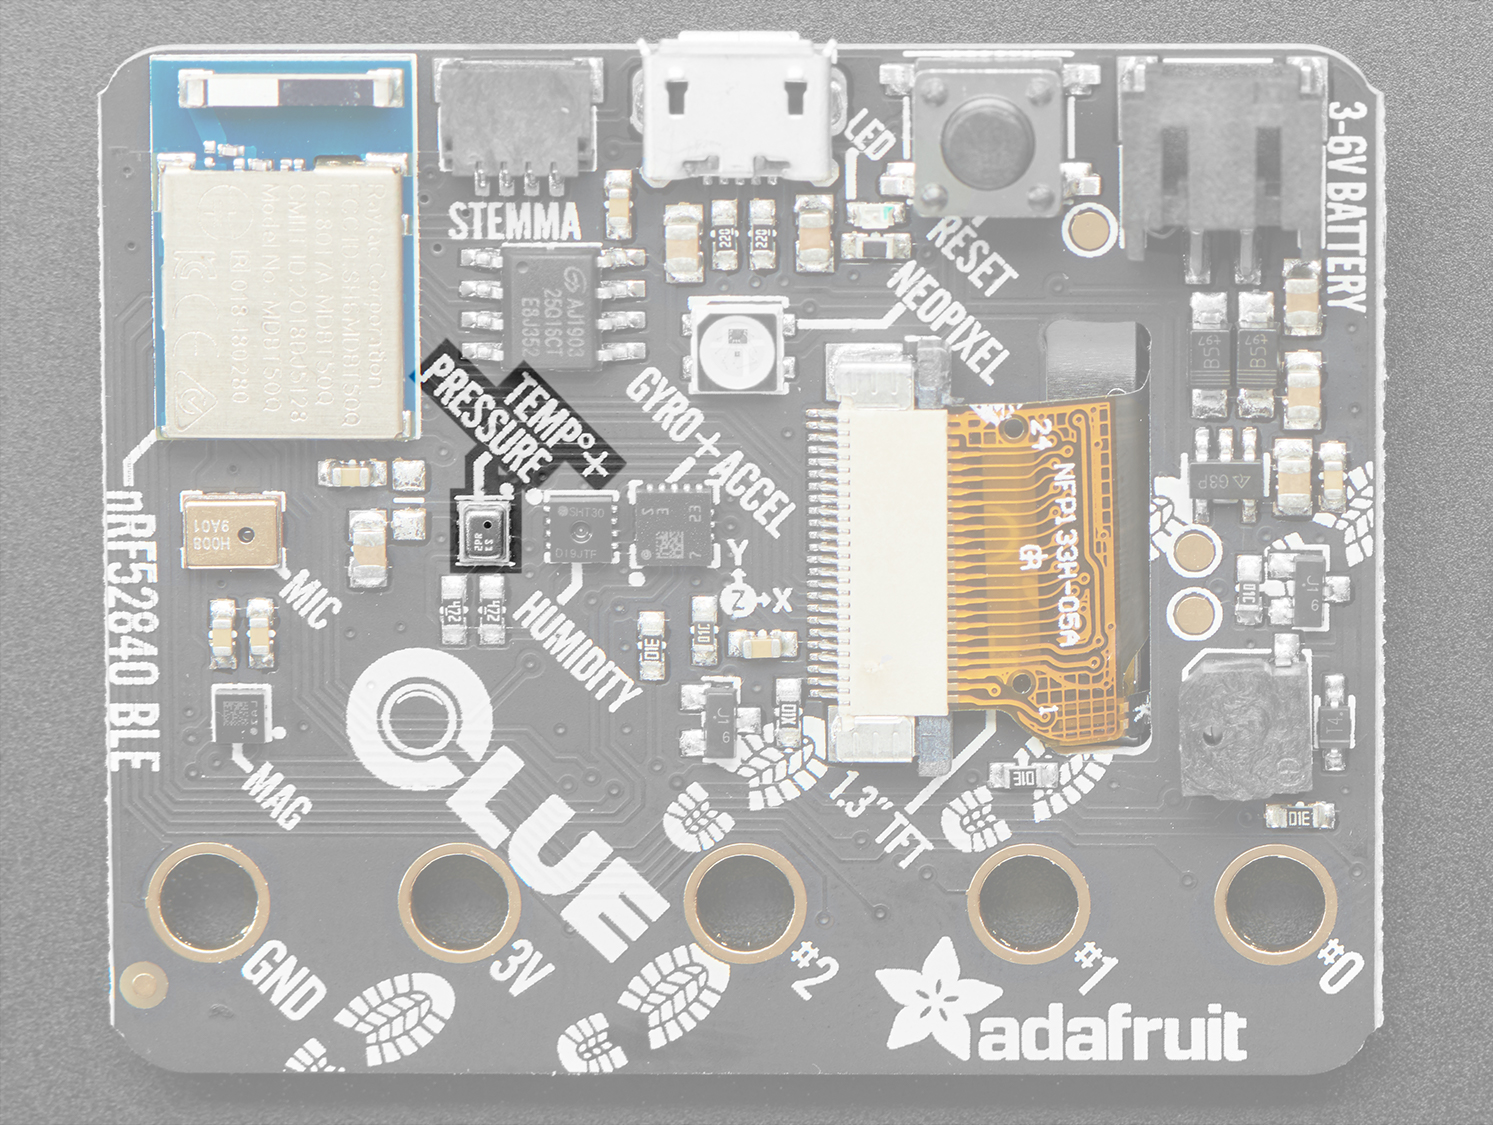
This example prints the value. Try moving the board vertically to see the value change.
from adafruit_clue import clue

clue.sea_level_pressure = 1015

print("Altitude: {:.1f}m".format(clue.altitude))
- property button_a: bool
Truewhen Button A is pressed.Falseif not.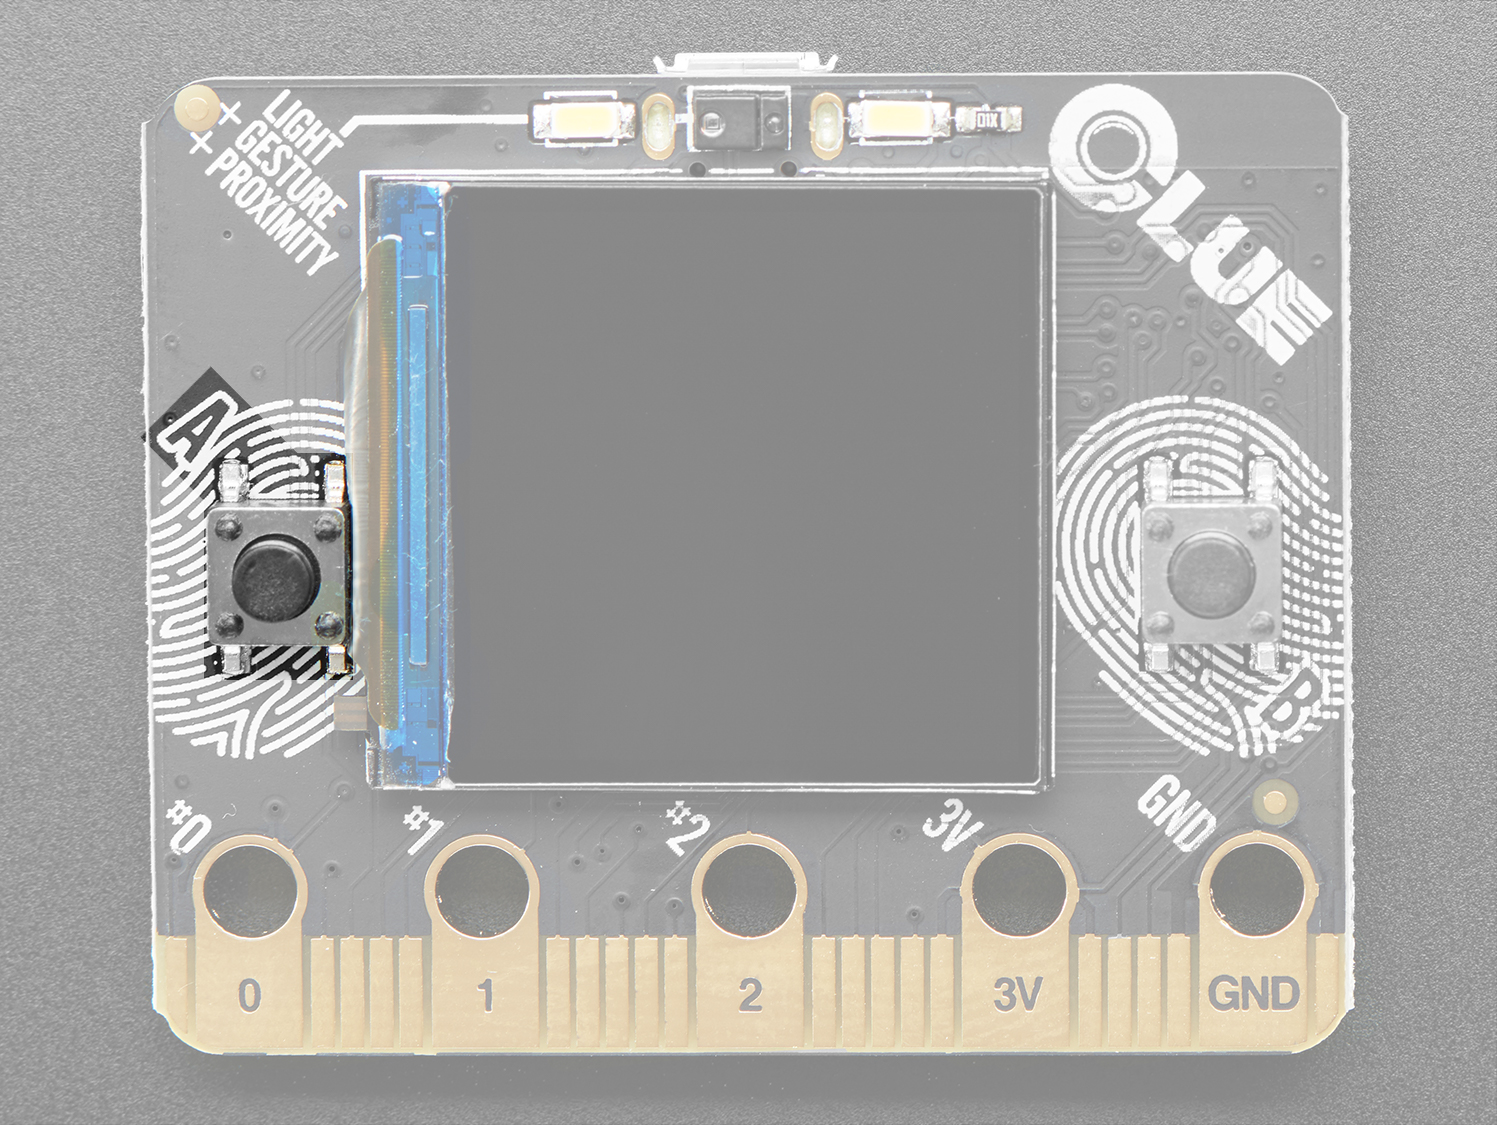
This example prints when button A is pressed.
To use with the CLUE:
from adafruit_clue import clue

while True:
    if clue.button_a:
        print("Button A pressed")
- property button_b: bool
Truewhen Button B is pressed.Falseif not.
This example prints when button B is pressed.
To use with the CLUE:
from adafruit_clue import clue

while True:
    if clue.button_b:
        print("Button B pressed")
- property color: Tuple[int, int, int, int]
The red, green, blue, and clear light values. (r, g, b, c)

This example prints the values. Try holding something up to the sensor to see the values change. Works best with white LEDs enabled.
To use with the CLUE:
from adafruit_clue import clue

while True:
    print("Color: R: {} G: {} B: {} C: {}".format(*clue.color))
- property gesture: int
A gesture code if gesture is detected. Shows
0if no gesture detected.1if an UP gesture is detected,2if DOWN,3if LEFT, and4if RIGHT.
This example prints the gesture values. Try moving your hand up, down, left or right over the sensor to see the value change.
To use with the CLUE:
from adafruit_clue import clue

while True:
    value = clue.gesture
    if value:
        print("gesture: {}".format(value))
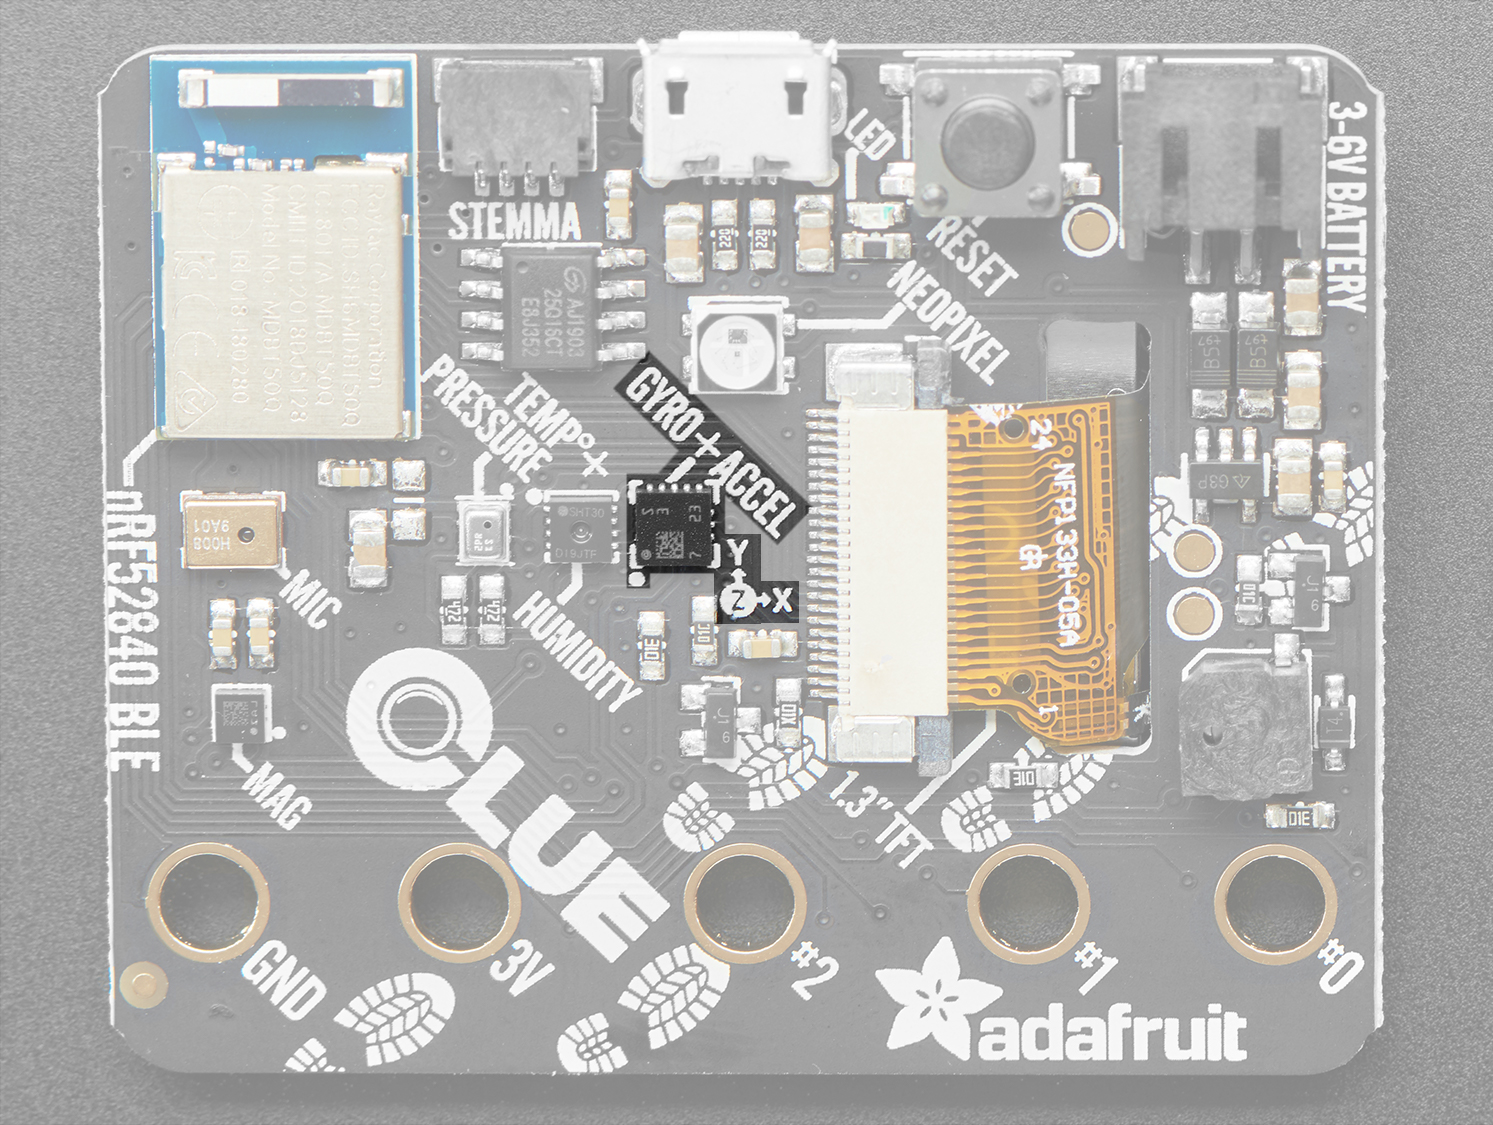
- property gyro: Tuple[int, int, int]
Obtain x, y, z angular velocity values in degrees/second.
This example prints the values. Try moving the board to see how the printed values change.
To use with the CLUE:
from adafruit_clue import clue

while True:
    print("Gyro: {:.2f} {:.2f} {:.2f}".format(*clue.gyro))
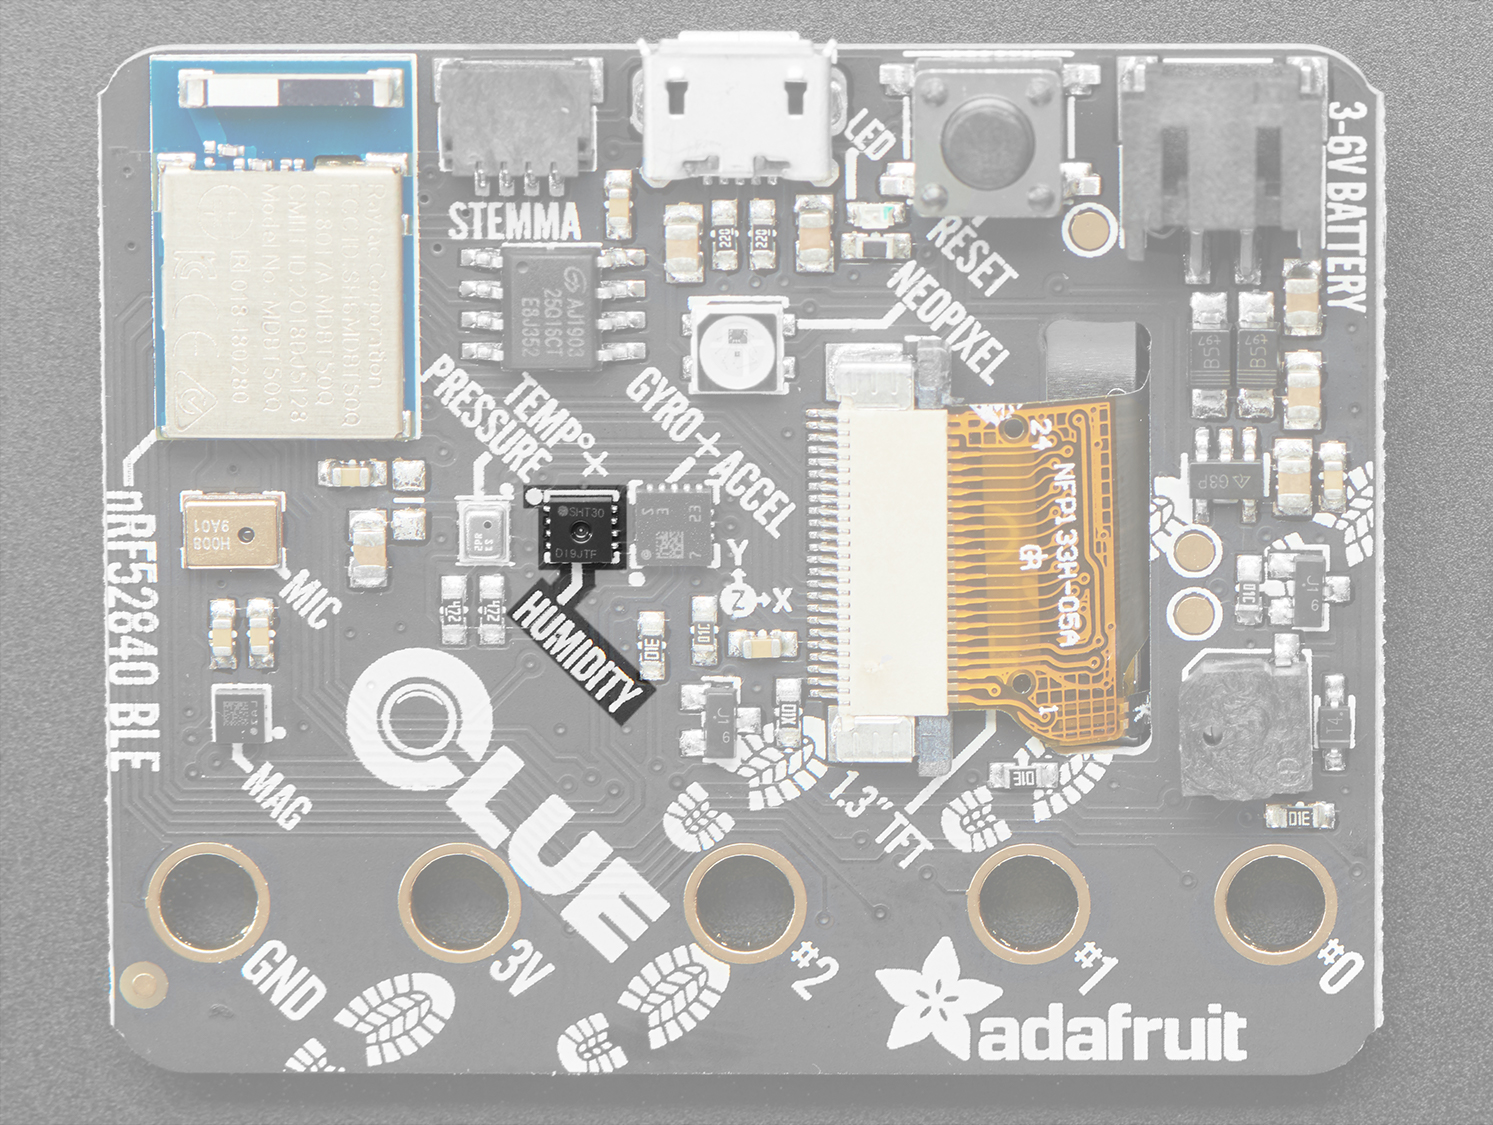
- property humidity: float
The measured relative humidity in percent.
This example prints the value. Try breathing on the sensor to see the values change.
To use with the CLUE:
from adafruit_clue import clue

while True:
    print("Humidity: {:.1f}%".format(clue.humidity))
- loud_sound(sound_threshold: int = 200) bool
Utilise a loud sound as an input.
- Parameters:
sound_threshold (int) – Threshold sound level must exceed to return true (Default: 200)
This example turns the NeoPixel LED blue each time you make a loud sound. Try clapping or blowing onto the microphone to trigger it.
from adafruit_clue import clue

while True:
    if clue.loud_sound():
        clue.pixel.fill((0, 50, 0))
    else:
        clue.pixel.fill(0)
You may find that the code is not responding how you would like. If this is the case, you can change the loud sound threshold to make it more or less responsive. Setting it to a higher number means it will take a louder sound to trigger. Setting it to a lower number will take a quieter sound to trigger. The following example shows the threshold being set to a higher number than the default.
from adafruit_clue import clue

while True:
    if clue.loud_sound(sound_threshold=300):
        clue.pixel.fill((0, 50, 0))
    else:
        clue.pixel.fill(0)
- property magnetic: Tuple[int, int, int]
Obtain x, y, z magnetic values in microteslas.
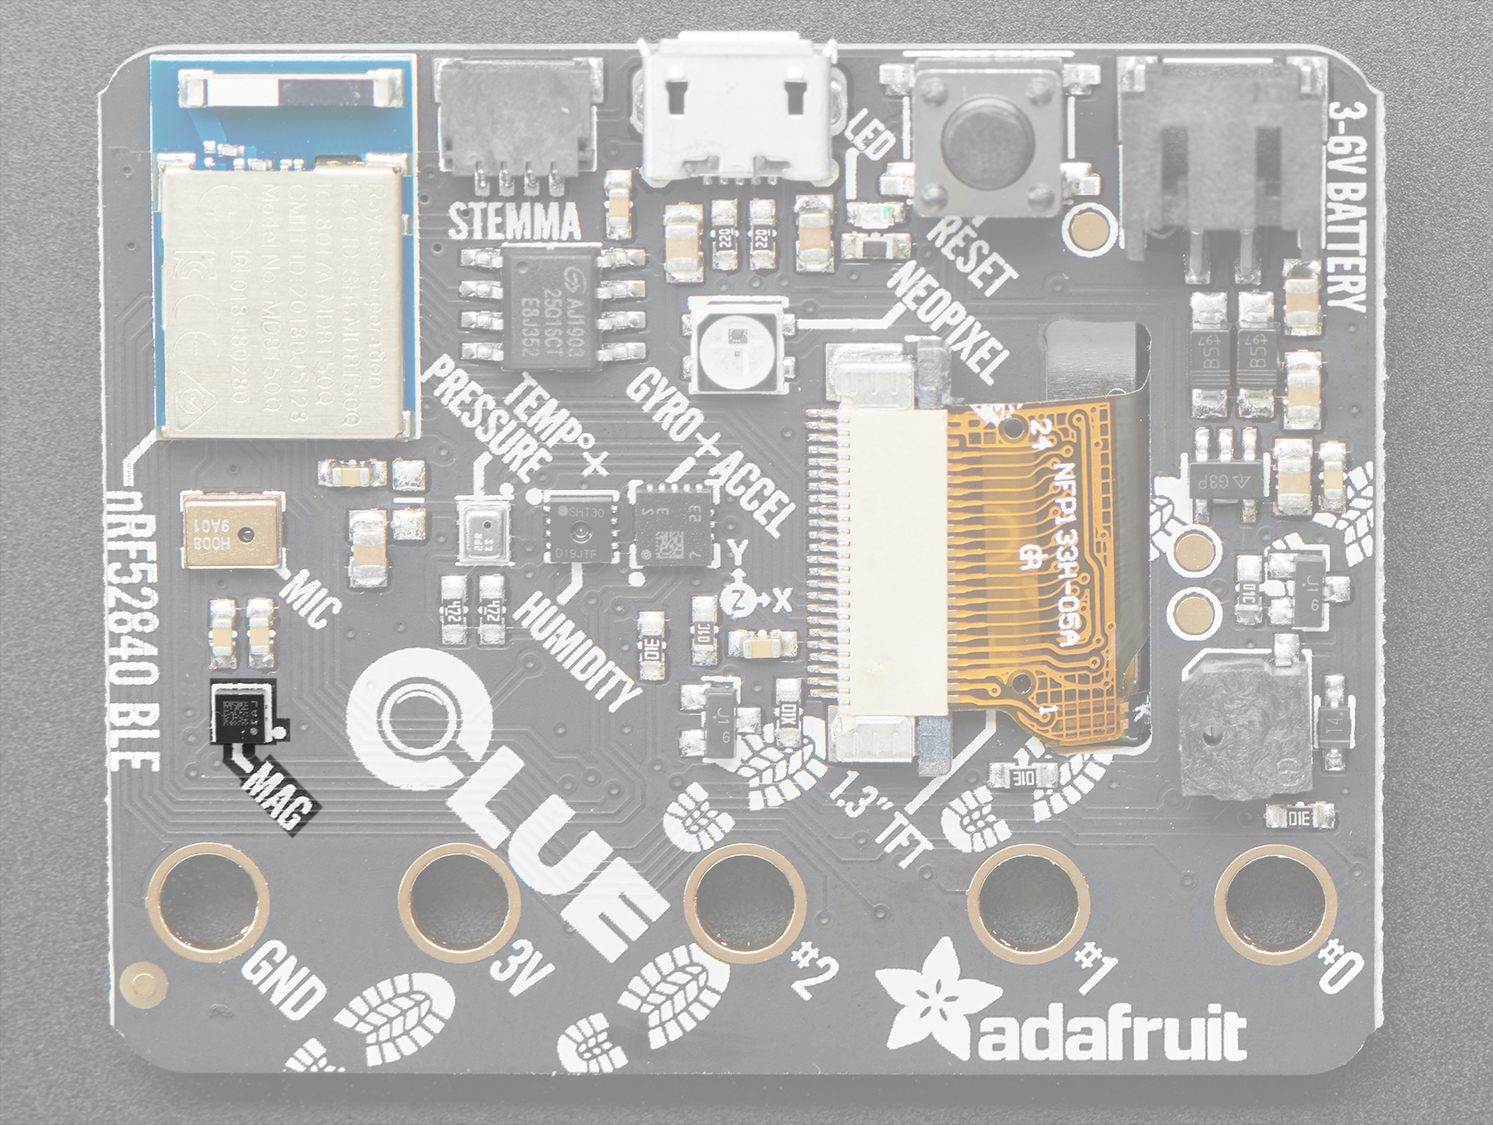
This example prints the values. Try moving the board to see how the printed values change.
To use with the CLUE:
from adafruit_clue import clue

while True:
    print("Magnetic: {:.3f} {:.3f} {:.3f}".format(*clue.magnetic))
- property pixel: neopixel.NeoPixel
The NeoPixel RGB LED.
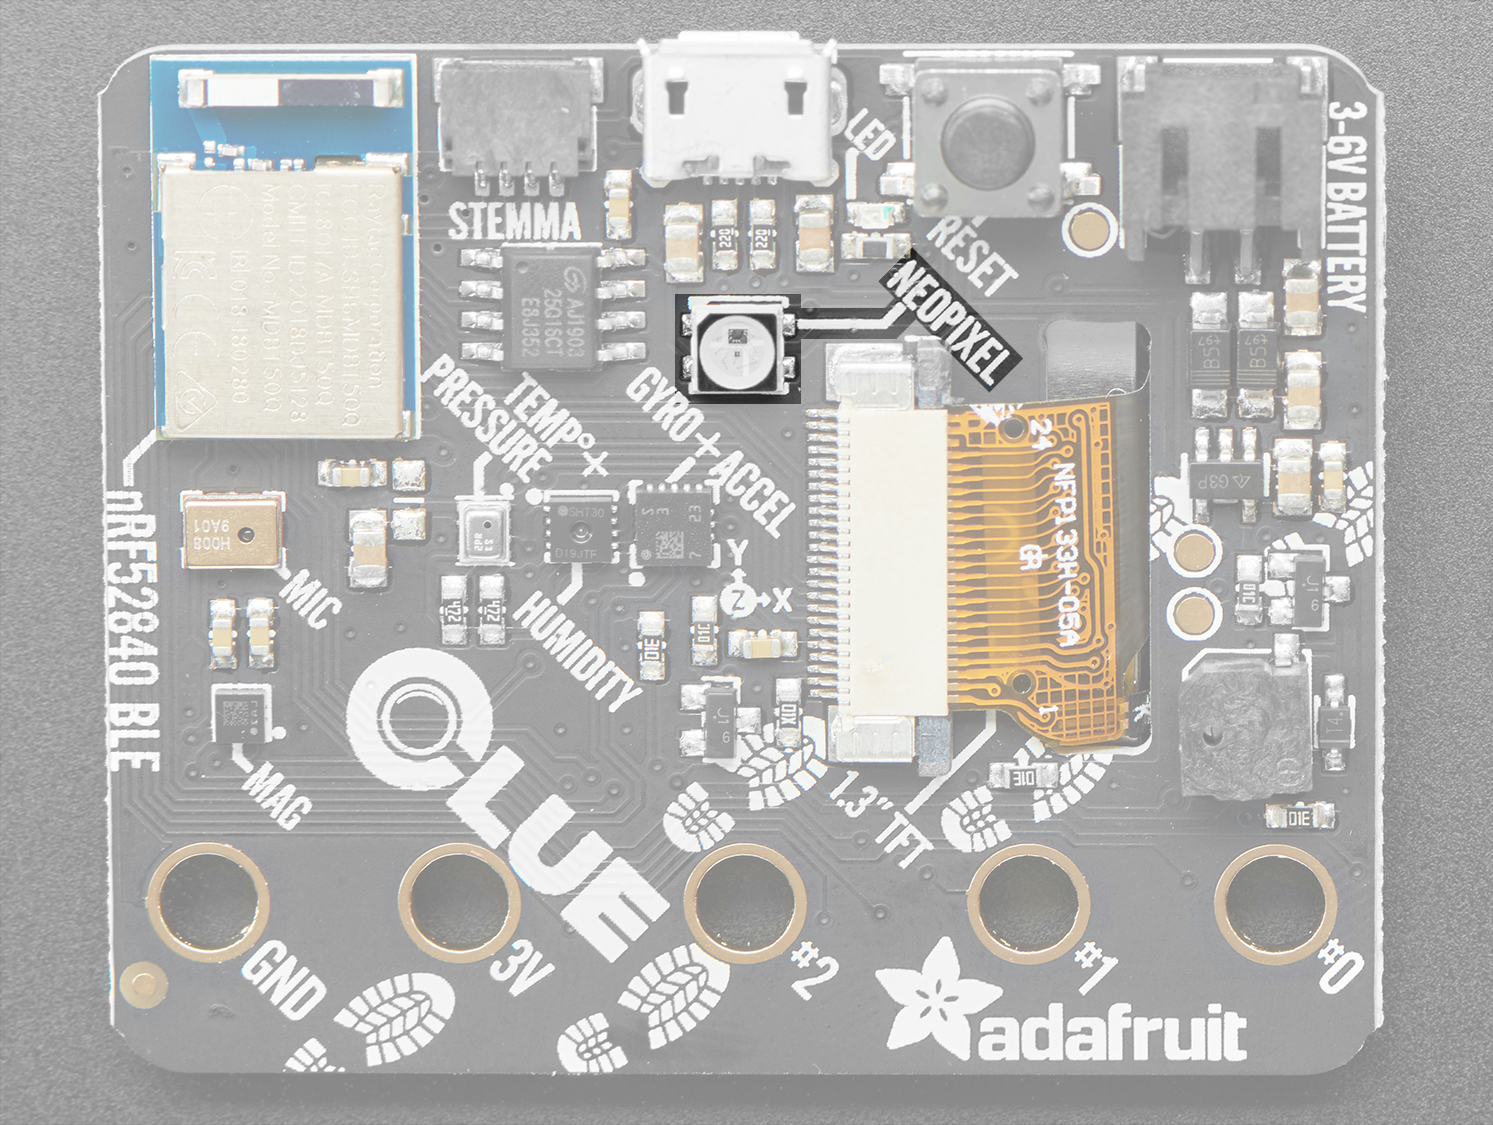
This example turns the NeoPixel purple.
To use with the CLUE:
from adafruit_clue import clue

while True:
    clue.pixel.fill((255, 0, 255))
- play_tone(frequency: int, duration: float)
Produce a tone using the speaker. Try changing frequency to change the pitch of the tone.
- Parameters:
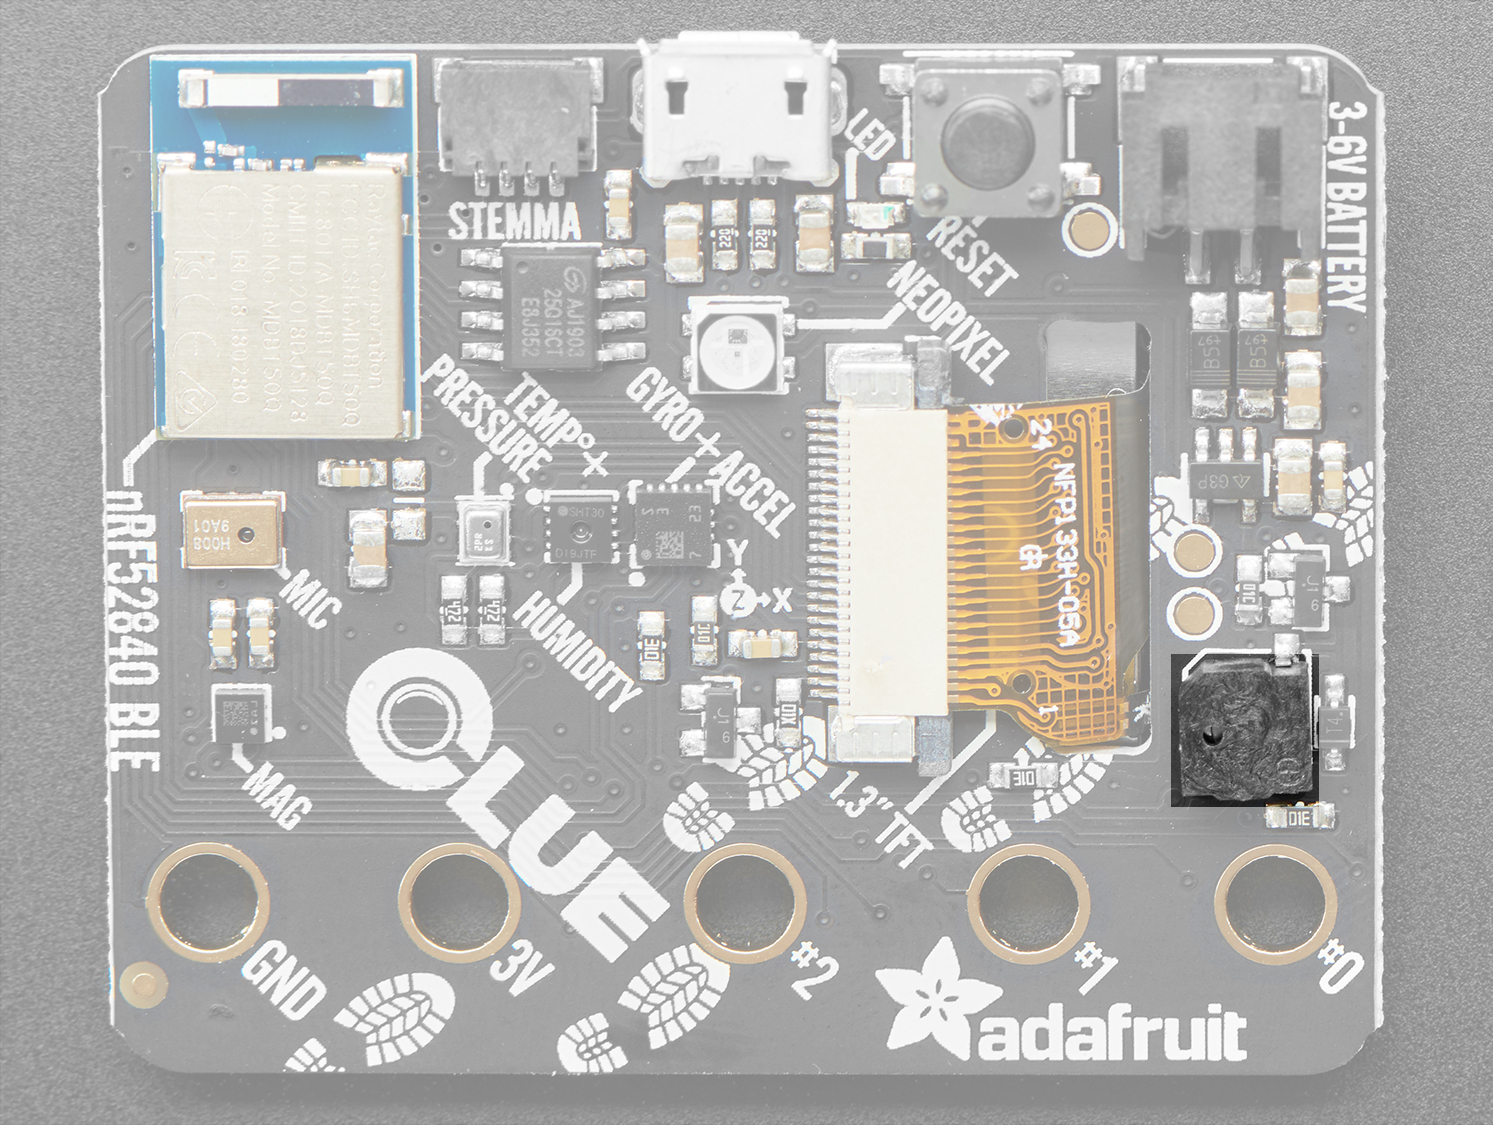
This example plays a 880 Hz tone for a duration of 1 second.
To use with the CLUE:
from adafruit_clue import clue

clue.play_tone(880, 1)
- property pressure: float
The barometric pressure in hectoPascals.
This example prints the value.
To use with the CLUE:
from adafruit_clue import clue

print("Pressure: {:.3f}hPa".format(clue.pressure))
- property proximity: int
A relative proximity to the sensor in values from 0 - 255.
This example prints the value. Try moving your hand towards and away from the front of the board to see how the printed values change.
To use with the CLUE:
from adafruit_clue import clue

while True:
    print("Proximity: {}".format(clue.proximity))
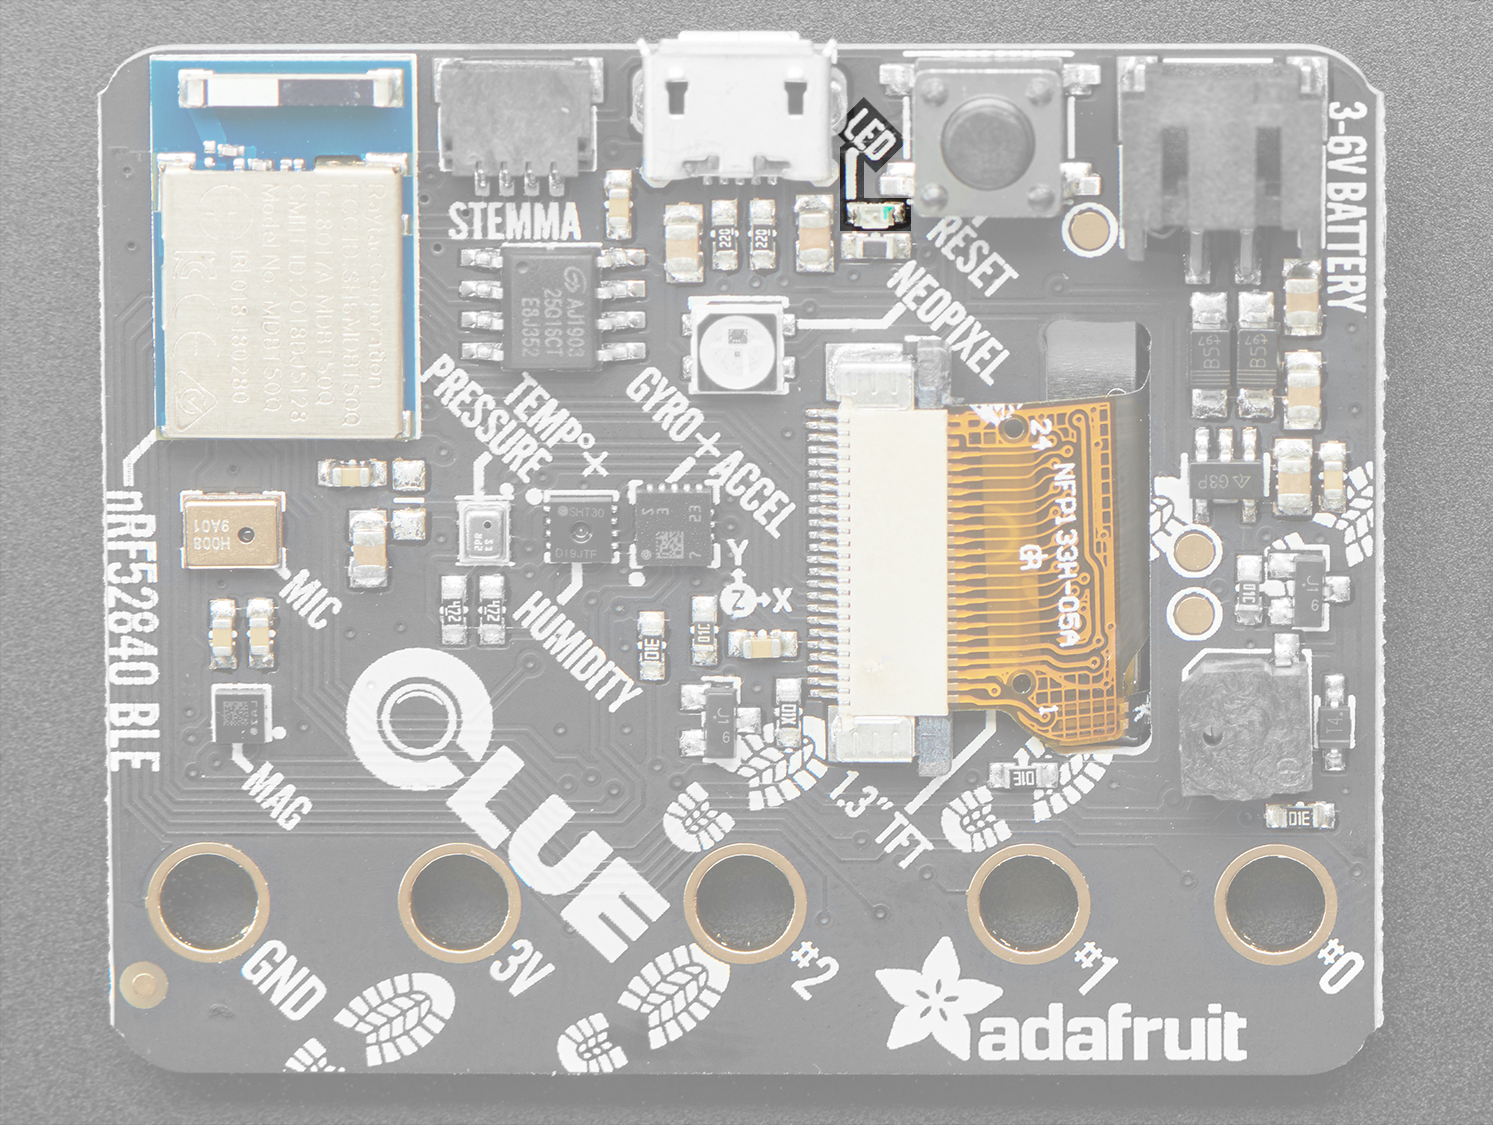
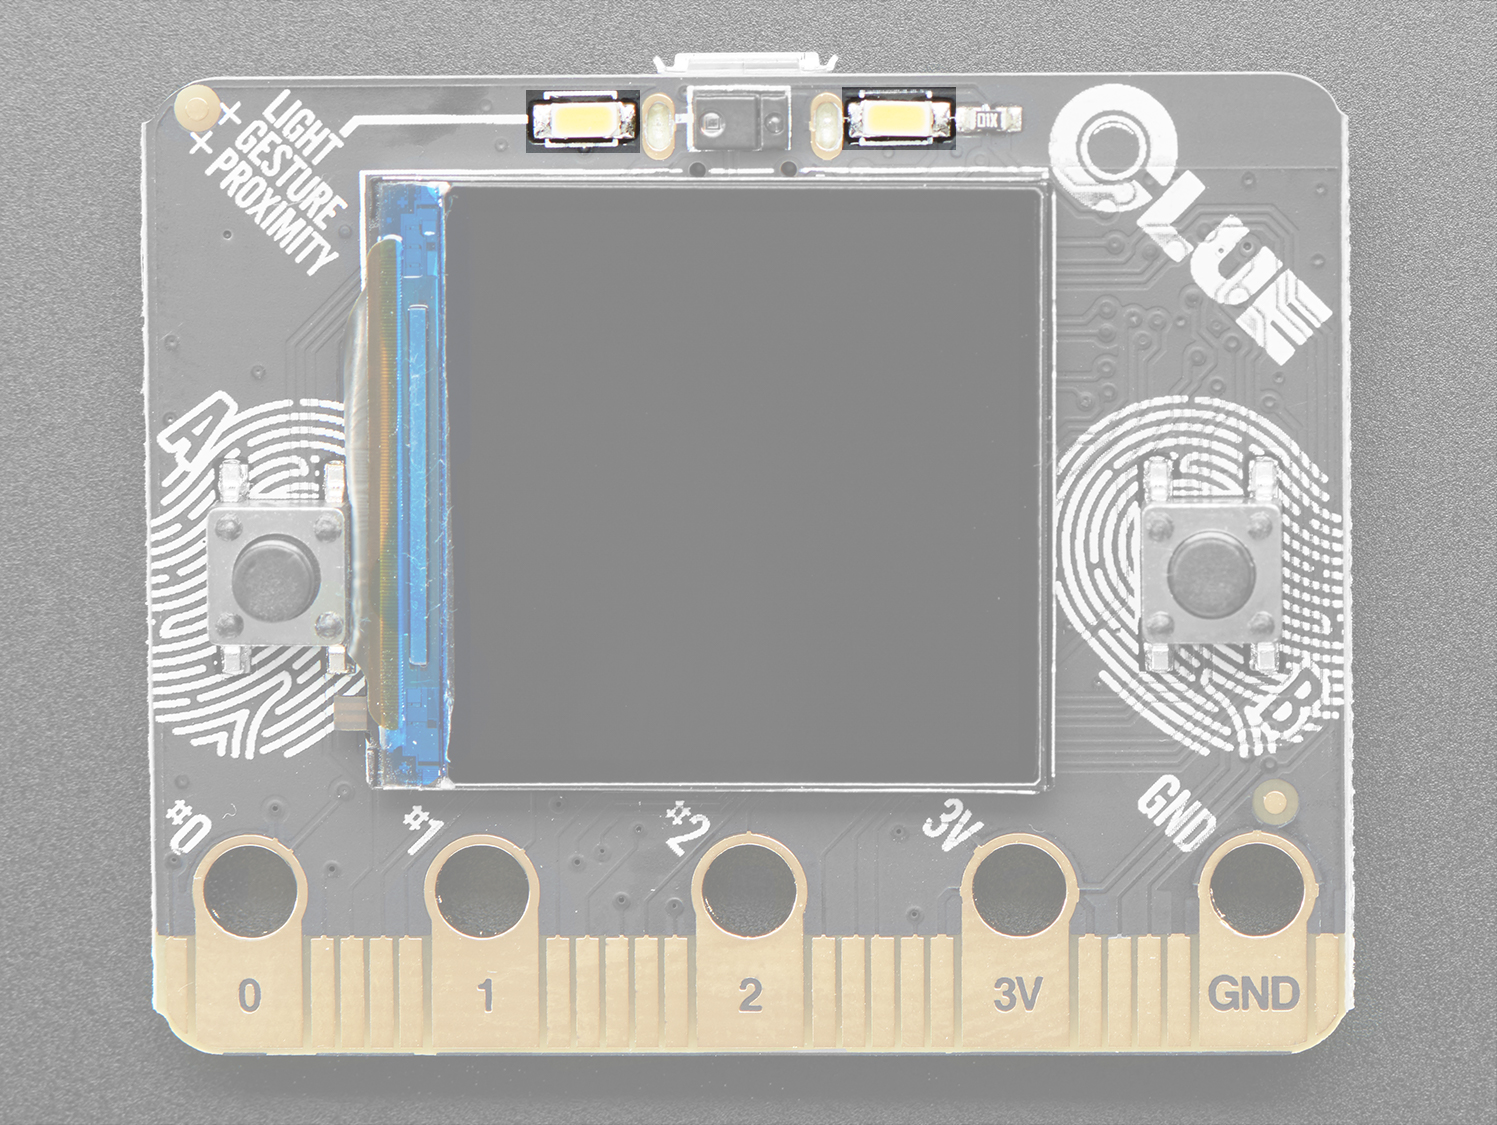
- property red_led: bool
The red led next to the USB plug labeled LED.
This example turns on the red LED.
To use with the CLUE:
from adafruit_clue import clue

clue.red_led = True
- property sea_level_pressure: float
Set to the pressure at sea level at your location, before reading altitude for the most accurate altitude measurement.
This example prints the value.
To use with the CLUE:
from adafruit_clue import clue

clue.sea_level_pressure = 1015

print("Pressure: {:.3f}hPa".format(clue.pressure))
- shake(shake_threshold: int = 30, avg_count: int = 10, total_delay: float = 0.1) bool
Detect when the accelerometer is shaken. Optional parameters:
- Parameters:
shake_threshold – Increase or decrease to change shake sensitivity. This requires a minimum value of 10. 10 is the total acceleration if the board is not moving, therefore anything less than 10 will erroneously report a constant shake detected. (Default 30)
avg_count – The number of readings taken and used for the average acceleration. (Default 10)
total_delay – The total time in seconds it takes to obtain avg_count readings from acceleration. (Default 0.1)
- static simple_text_display(title: str | None = None, title_color: Tuple = (255, 255, 255), title_scale: int = 1, text_scale: int = 1, font: str | None = None, colors: Tuple[Tuple[int, int, int], ...] | None = None)
Display lines of text on the CLUE display. Lines of text are created in order as shown in the example below. If you skip a number, the line will be shown blank on the display, e.g. if you include
[0]and[2], the second line on the display will be empty, and the text specified for lines 0 and 2 will be displayed on the first and third line. Remember, Python begins counting at 0, so the first line on the display is 0 in the code.Setup occurs before the loop. For data to be dynamically updated on the display, you must include the data call in the loop by using
.text =. For example, if setup is saved asclue_data = simple_text_display()thenclue_data[0].text = clue.proximitymust be inside thewhile True:loop for the proximity data displayed to update as the values change. You must callshow()at the end of the list for anything to display. See example below for usage.- Parameters:
title (str) – The title displayed above the data. Set
title="Title text"to provide a title. Defaults to None.title_color – The color of the title. Not necessary if no title is provided. Defaults to white (255, 255, 255).
title_scale (int) – Scale the size of the title. Not necessary if no title is provided. Defaults to 1.
text_scale (int) – Scale the size of the data lines. Scales the title as well. Defaults to 1.
font (str) – The font to use to display the title and data. Defaults to built in
terminalio.FONT.colors – A list of colors for the lines of data on the display. If you provide a single color, all lines will be that color. Otherwise it will cycle through the list you provide if the list is less than the number of lines displayed. Default colors are used if
colorsis not set. For example, if creating two lines of data,colors=((255, 255, 255), (255, 0, 0))would set the first line white and the second line red, and if you created four lines of data with the same setup, it would alternate white and red.
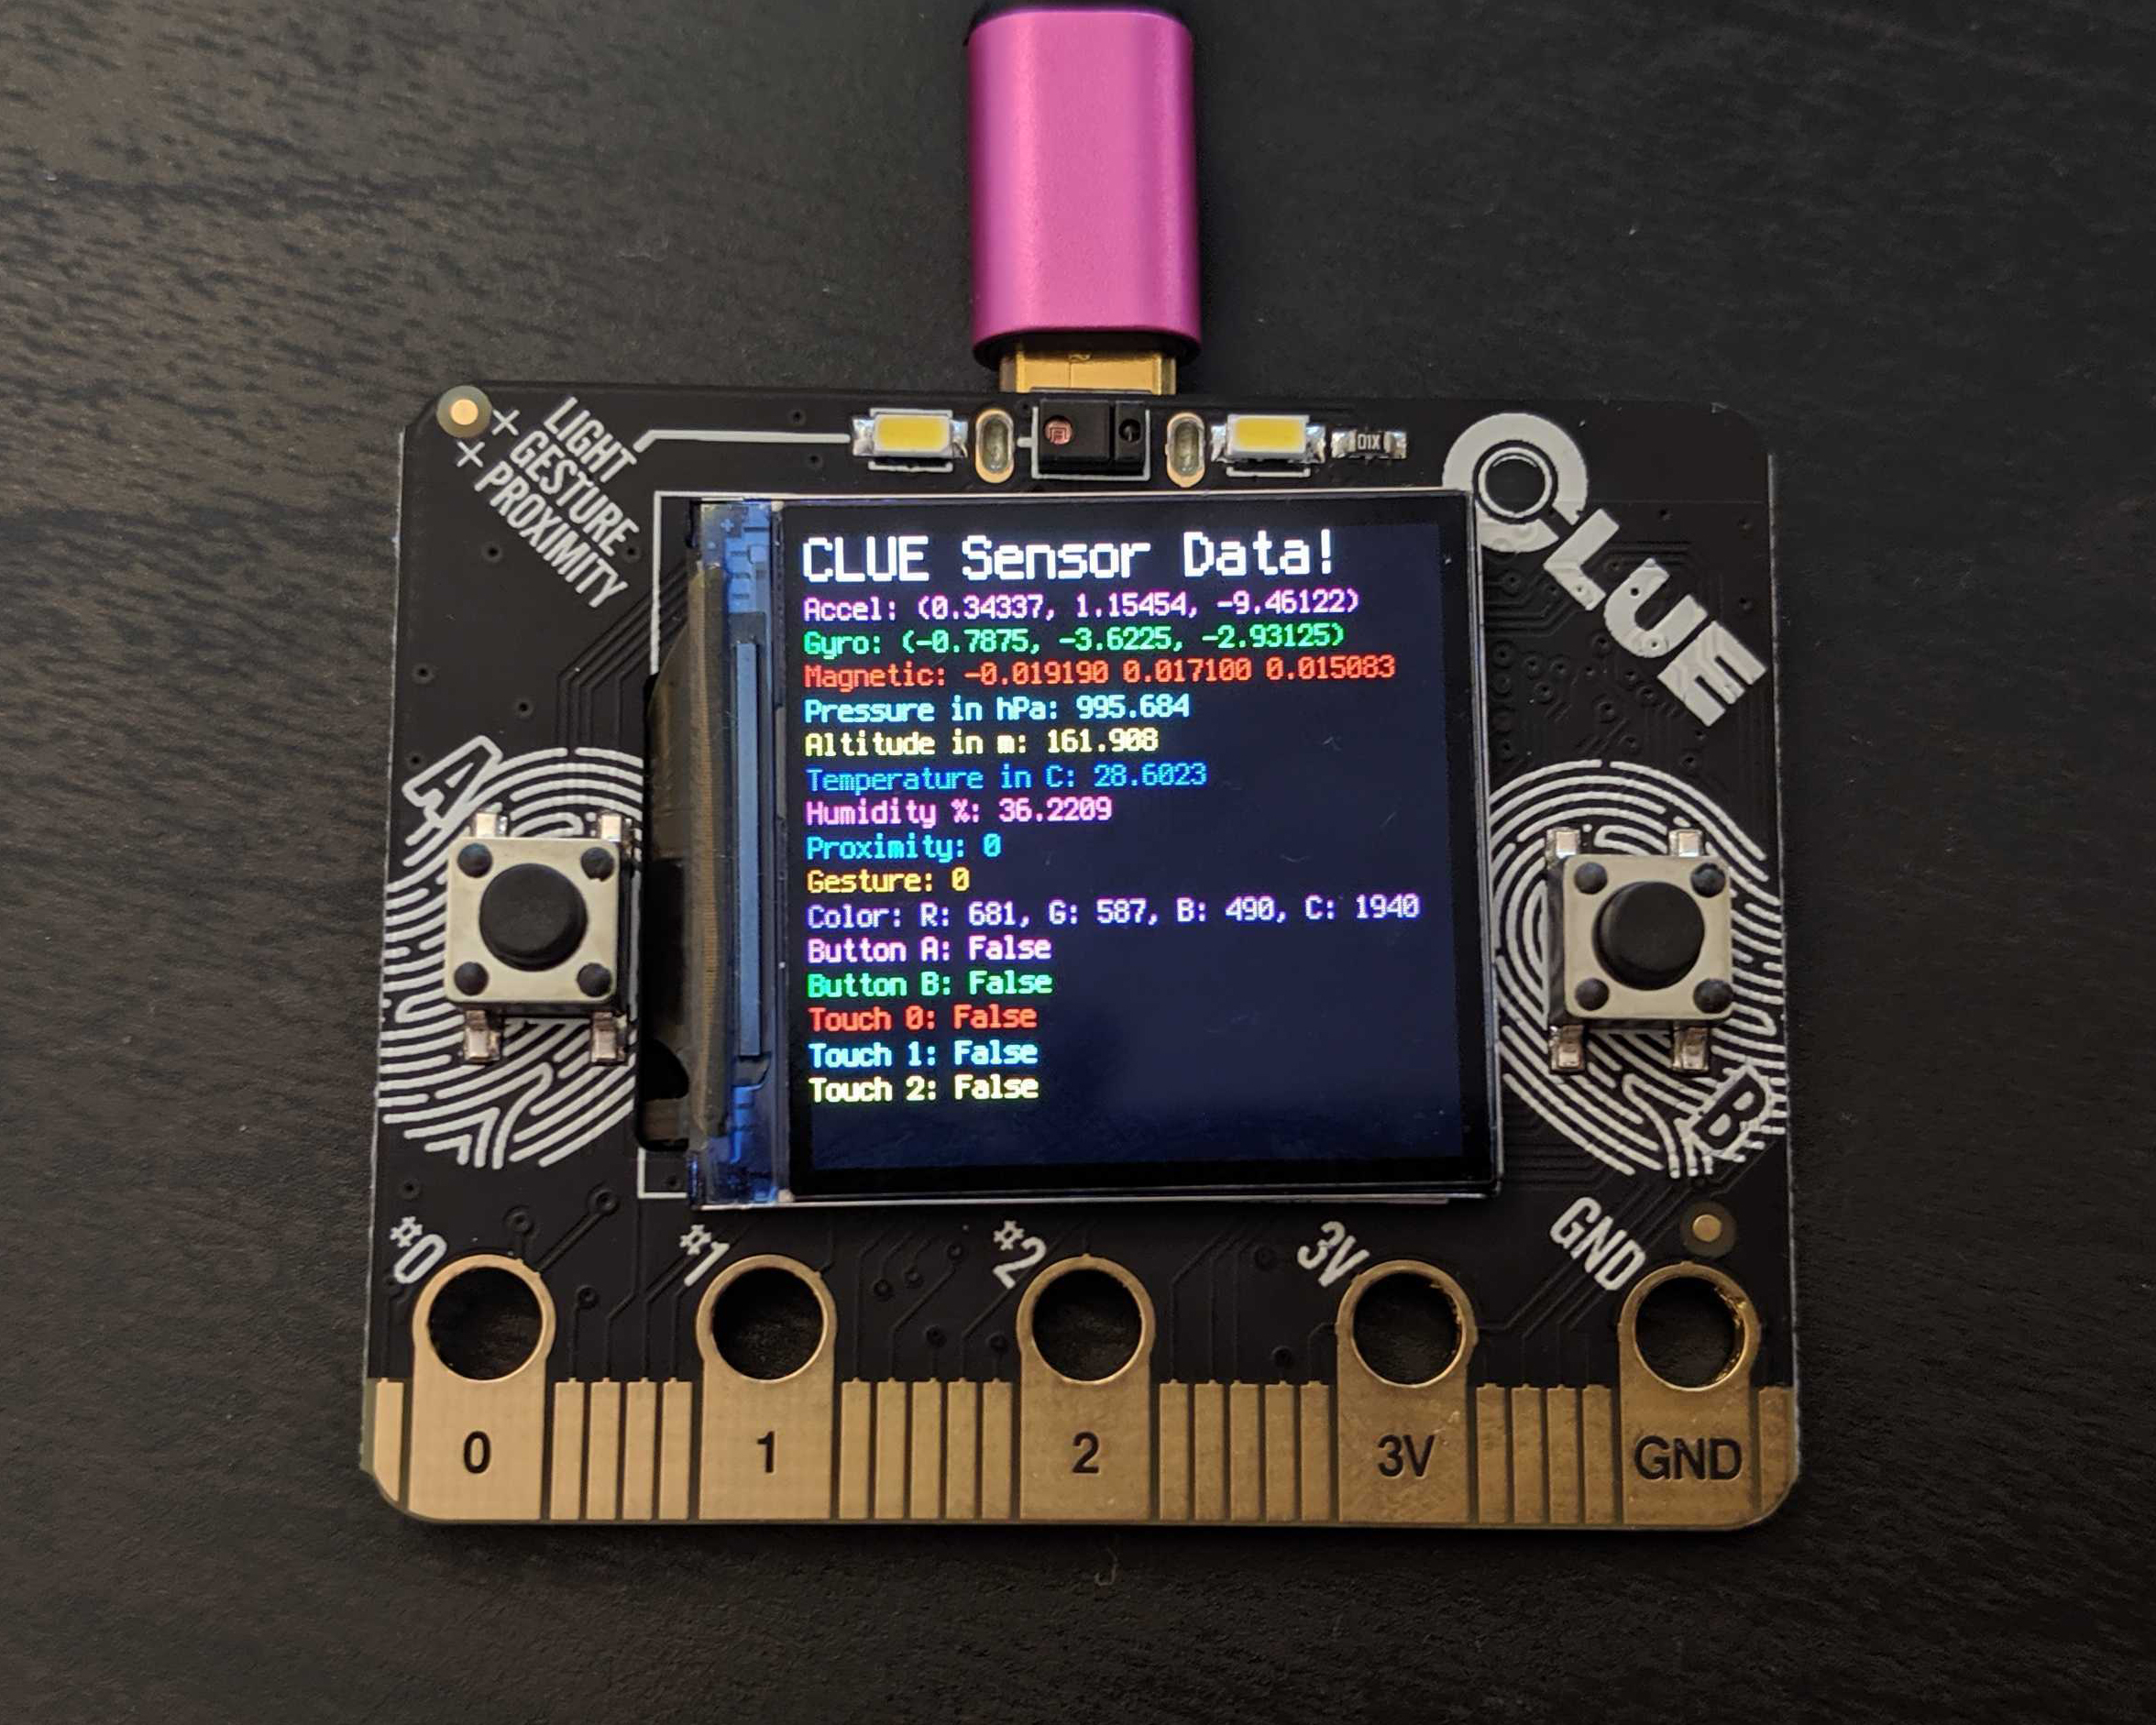
This example displays three lines with acceleration, gyro and magnetic data on the display. Remember to call
show()after the list to update the display.from adafruit_clue import clue clue_data = clue.simple_text_display(title="CLUE Sensor Data!", title_scale=2) while True: clue_data[0].text = "Acceleration: {:.2f} {:.2f} {:.2f}".format(*clue.acceleration) clue_data[1].text = "Gyro: {:.2f} {:.2f} {:.2f}".format(*clue.gyro) clue_data[2].text = "Magnetic: {:.3f} {:.3f} {:.3f}".format(*clue.magnetic) clue_data.show()
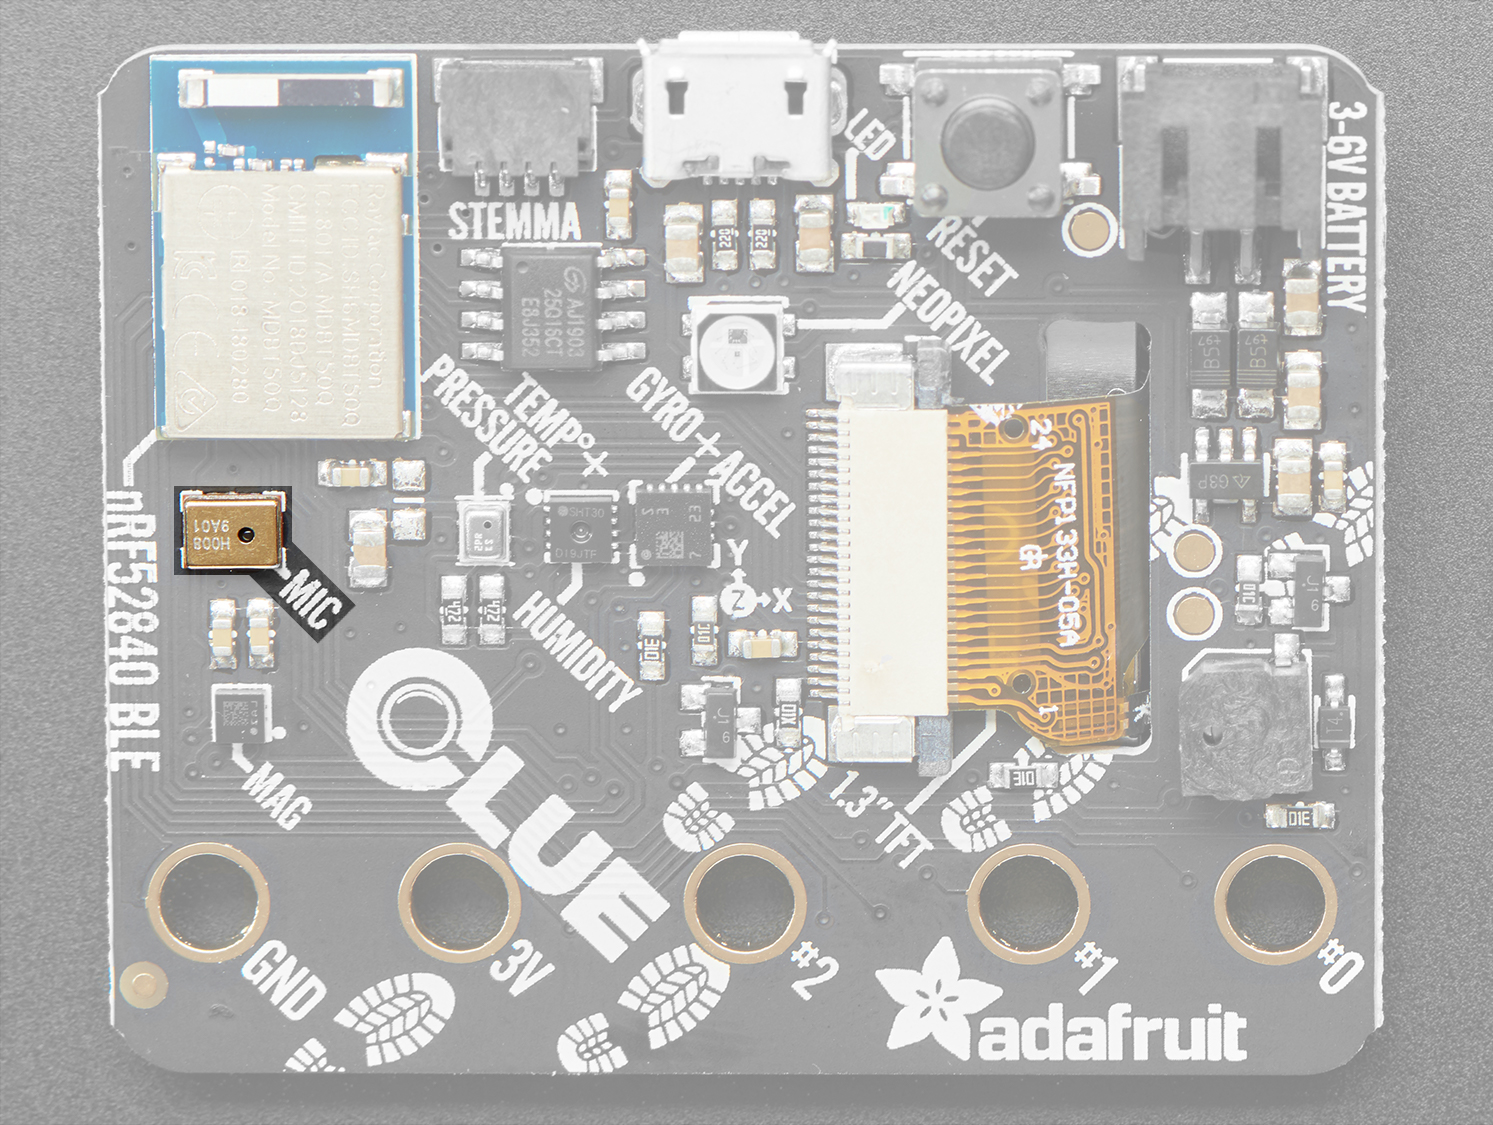
- property sound_level: float
Obtain the sound level from the microphone (sound sensor).
This example prints the sound levels. Try clapping or blowing on the microphone to see the levels change.
from adafruit_clue import clue

while True:
    print(clue.sound_level)
- start_tone(frequency: int)
Produce a tone using the speaker. Try changing frequency to change the pitch of the tone.
- Parameters:
frequency (int) – The frequency of the tone in Hz
This example plays a 523Hz tone when button A is pressed and a 587Hz tone when button B is pressed, only while the buttons are being pressed.
To use with the CLUE:
from adafruit_clue import clue

while True:
    if clue.button_a:
        clue.start_tone(1600)
    elif clue.button_b:
        clue.start_tone(2000)
    else:
        clue.stop_tone()
- stop_tone()
Use with start_tone to stop the tone produced.
This example plays a 523Hz tone when button A is pressed and a 587Hz tone when button B is pressed, only while the buttons are being pressed.
To use with the CLUE:
from adafruit_clue import clue

while True:
    if clue.button_a:
        clue.start_tone(1600)
    elif clue.button_b:
        clue.start_tone(2000)
    else:
        clue.stop_tone()
- property temperature: float
The temperature in degrees Celsius.
This example prints the value. Try touching the sensor to see the value change.
To use with the CLUE:
from adafruit_clue import clue

print("Temperature: {:.1f}C".format(clue.temperature))
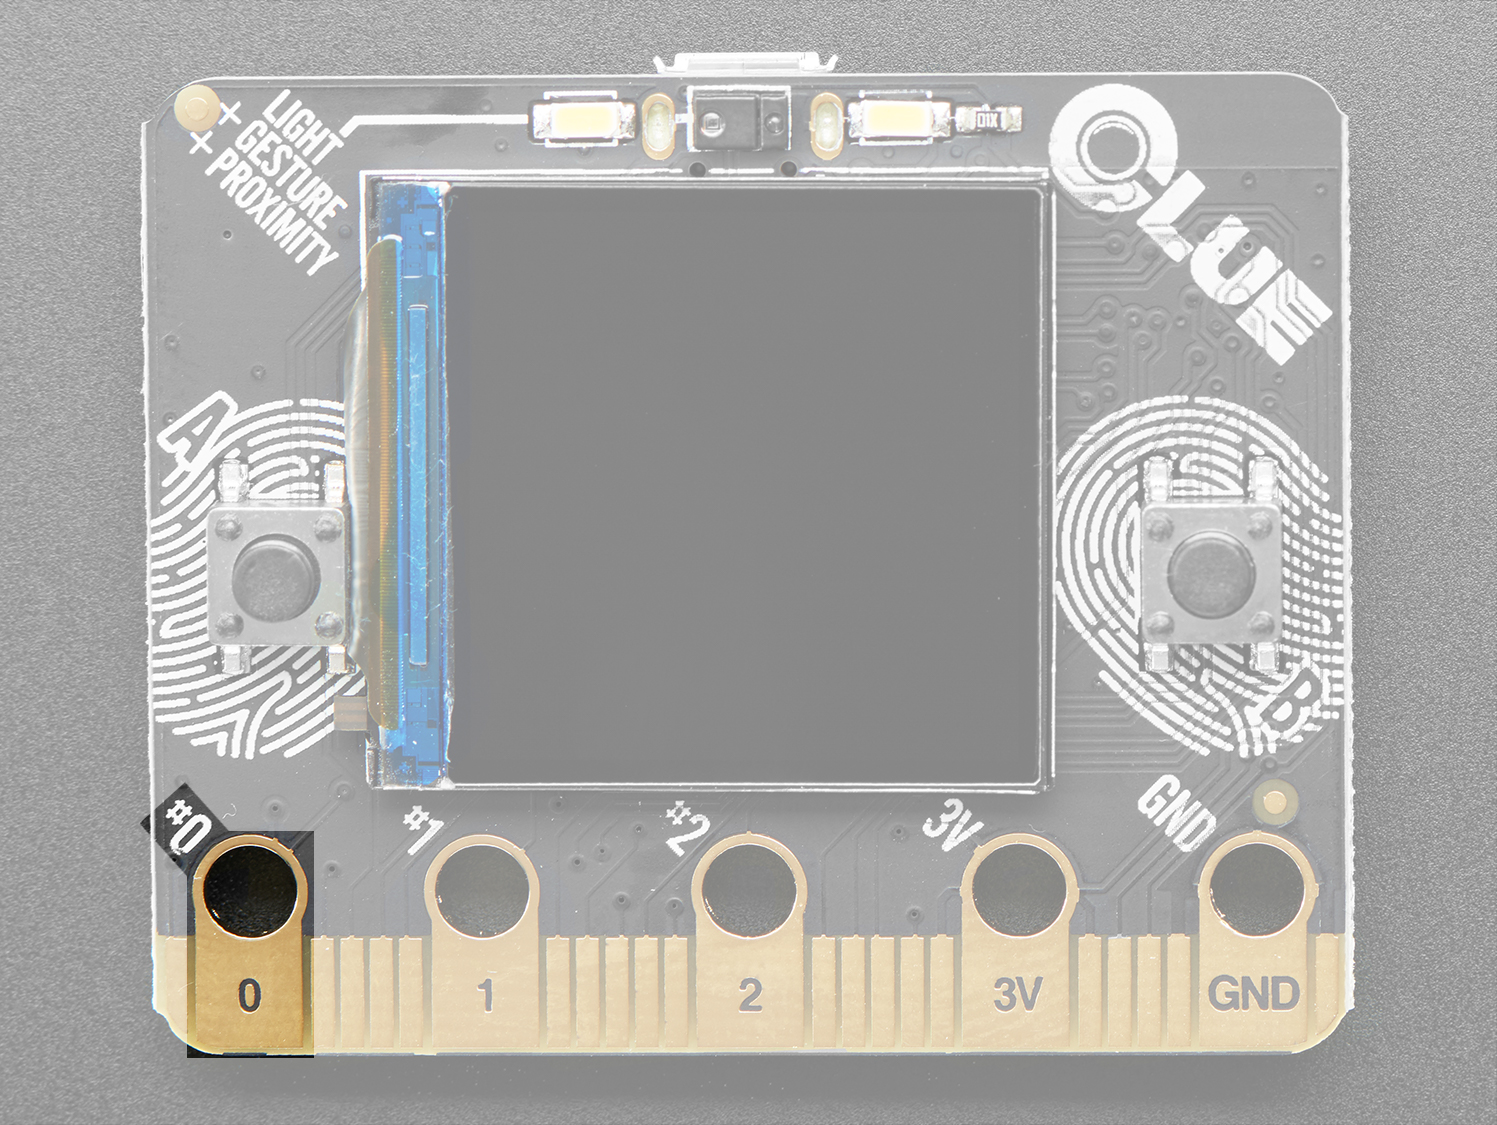
- property touch_0: bool
Detect touch on capacitive touch pad 0.
This example prints when pad 0 is touched.
To use with the CLUE:
from adafruit_clue import clue

while True:
    if clue.touch_0:
        print("Touched pad 0")
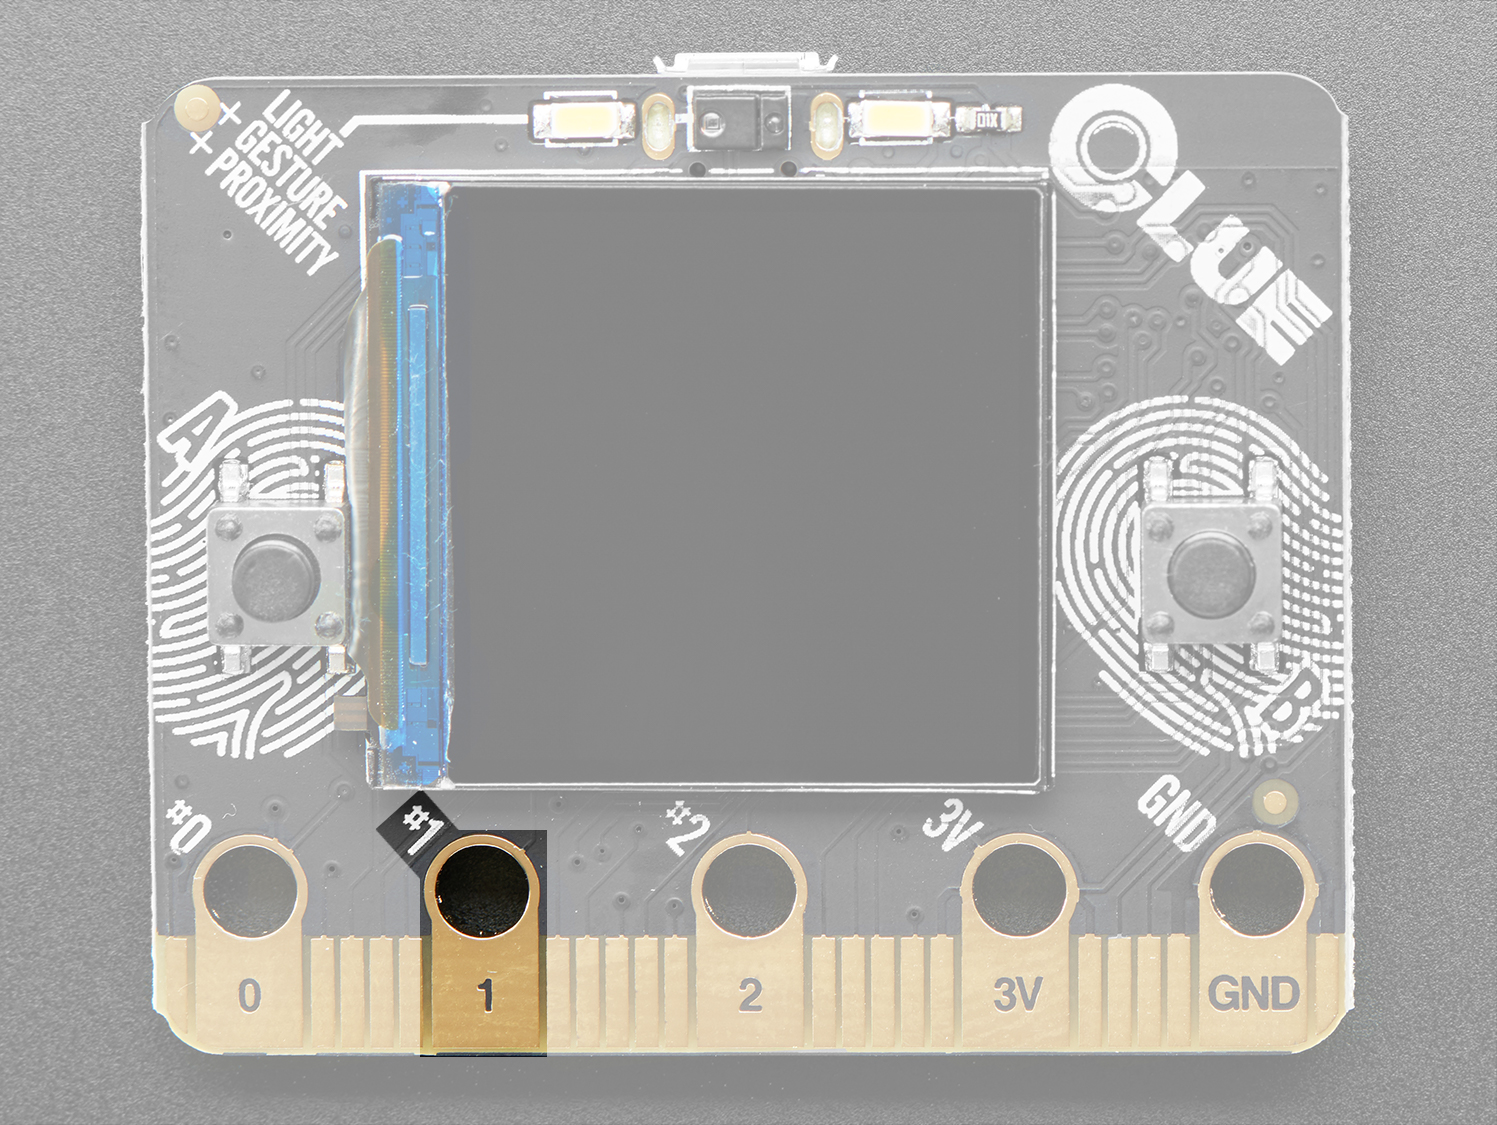
- property touch_1: bool
Detect touch on capacitive touch pad 1.
This example prints when pad 1 is touched.
To use with the CLUE:
from adafruit_clue import clue

while True:
    if clue.touch_1:
        print("Touched pad 1")
- property touch_2: bool
Detect touch on capacitive touch pad 2.
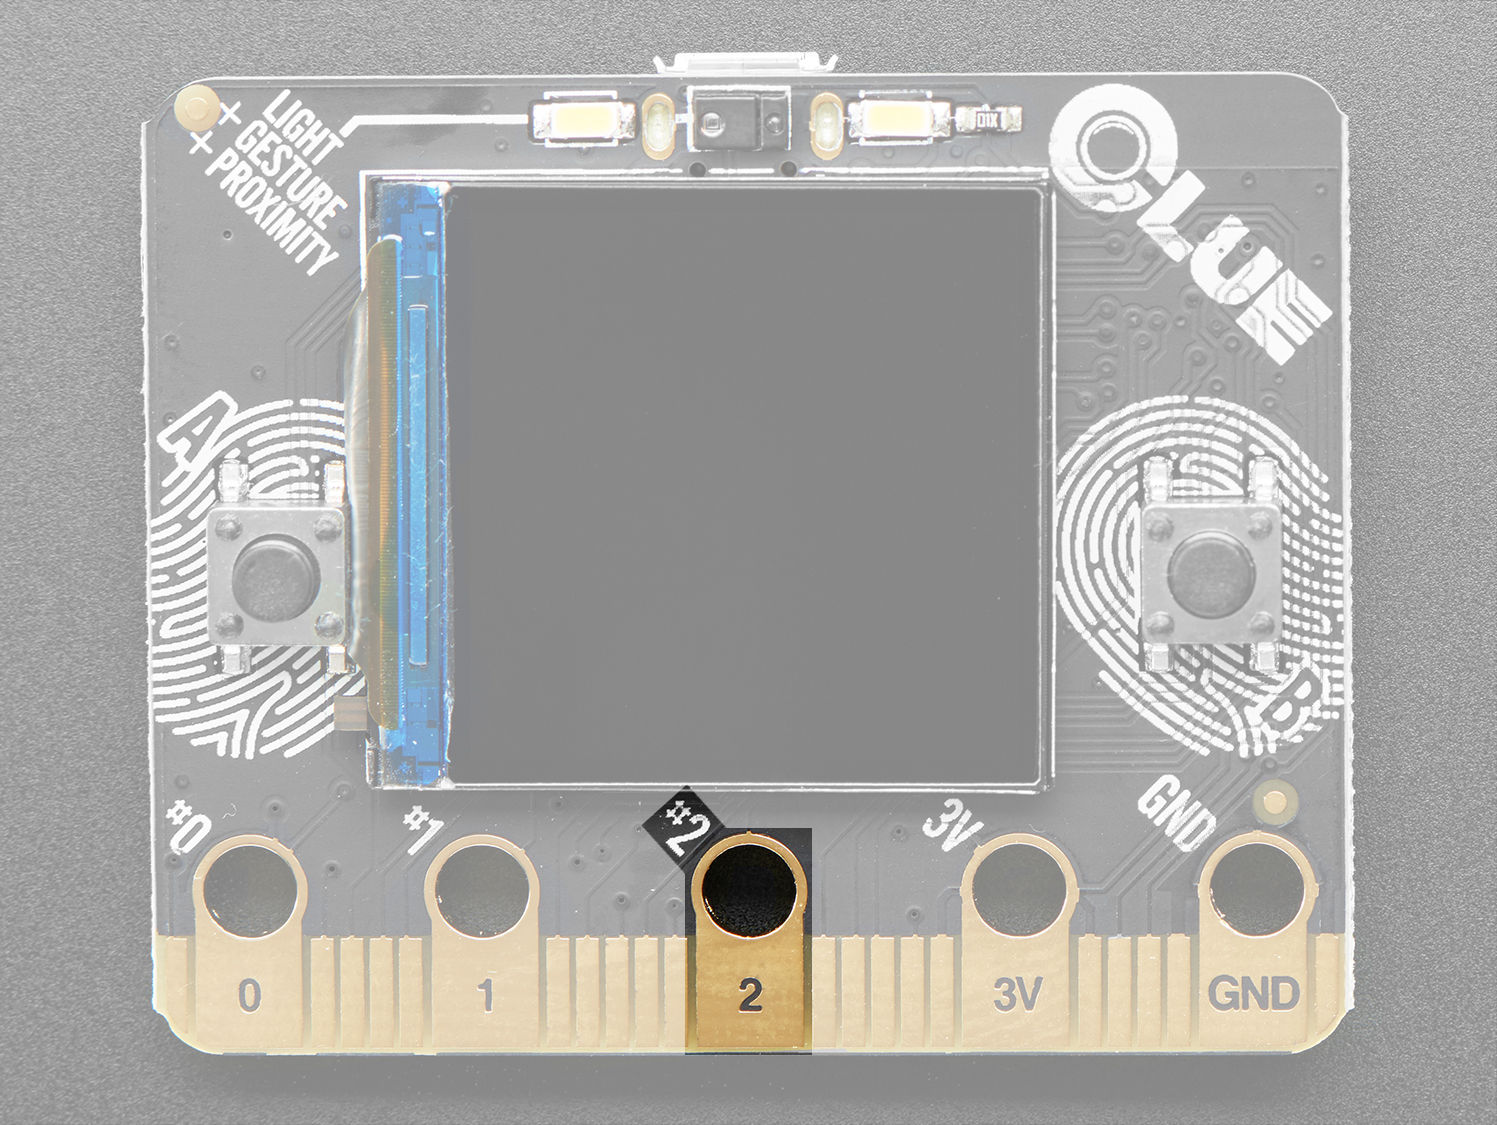
This example prints when pad 2 is touched.
To use with the CLUE:
from adafruit_clue import clue

while True:
    if clue.touch_2:
        print("Touched pad 2")
- property touched
A list of all the pins that are currently registering a touch
- adafruit_clue.clue = <adafruit_clue.Clue object>
Object that is automatically created on import.
To use, simply import it from the module:
from adafruit_clue import clue